
Setting the scene
Building, testing, and ensuring that your mobile application runs correctly on different devices and operating systems can become very cumbersome and expensive over time. The effort required for various device management tasks, such as maintaining the physical infrastructure, patching and updating devices, can be very costly for an organization if these tasks are performed by a developer or someone else in the organization. Imagine you have 15 or 20 different devices that need to be patched manually. This will take a couple of hours if everything is working as expected. The maintenance overhead increases linearly with the number of devices you manage. It is not only the different types of devices that are important, but also the combinations of devices and installed OS versions that can dramatically increase the testing effort.
AWS Device Farm to the rescue
Relax, there is a solution. AWS Device Farm to the rescue. With AWS Device Farm, AWS offers a solution that makes mobile testing a breeze. AWS Device Farm is a managed service on AWS that allows you to leverage a fleet of mobile devices and mobile environments from AWS via an on-demand model to provision devices for either manual or automated testing. The good news is, you can try AWS Device Farm and get the first 1000 minutes free.
Prerequisites
You will need the following for the example:
- Android Studio
- Android SDK
- Flutter (Version 3.0.5 or higher)
- Git
- AWS Account
- Some free space on your SSD ;-)
Flutter sample app
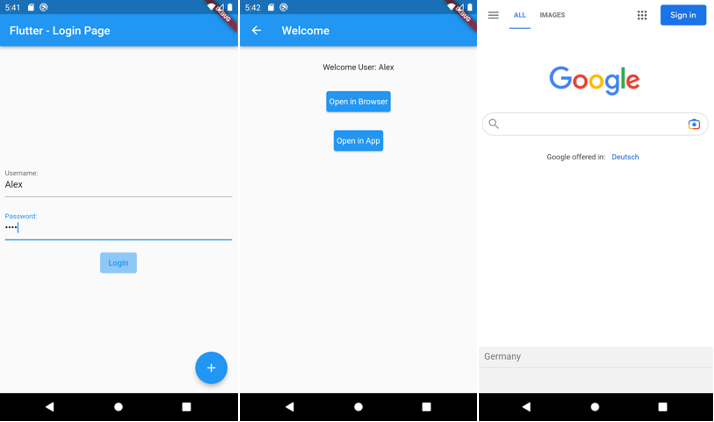
The sample Flutter app for testing is a simple login page with a username and password that takes you to a welcome page. From there, you can launch a browser application with a search engine web page.
Testing with Appium
Appium is a popular open source test automation framework for use with native, hybrid and mobile web applications. It uses the Webdriver protocol (similar to Selenium) and can be used to test iOS, Android and Windows apps. Appium is one of the testing frameworks directly supported by the AWS Device Farm. For more information, see the AWS documentation: https://docs.aws.amazon.com/devicefarm/latest/developerguide/test-types-appium.html With Appium, you can use specific annotations such as “AndroidFindBy” to identify elements on a mobile app screen, interact with these elements (clicking, entering text, …) and checking the state of these elements (e.g. is shown or is enabled). This can be done with several programming languages, like Java, Kotlin, Python, JavaScript, etc.
Here are some examples with Java.
// identifying elements with annotations
@AndroidFindBy(accessibility = "LoginText")
private MobileElement loginText;
// identifying elements programmatically
MobileElement loginText = driver.findElementByAccessibilityId("LoginText");
// perform a click
loginText.click()
// enter text
loginText.sendKeys("Hello");
// asking if element is shown or not
loginText.isDisplayed()
For writing Appium tests in Java you can also choose between different testing frameworks, like JUnit or TestNG.
Write Appium tests for AWS Device Farm
There is a sample app for the AWS Device Farm which illustrates what you need for your Appium tests on the AWS Device Farm.
See https://github.com/aws-samples/aws-device-farm-appium-tests-for-sample-app
An important step is to create a ZIP file containing all compiled Appium tests, and their dependencies (Appium jars) needed to run the tests. This ZIP file will later be uploaded to the AWS Device Farm along with the APP binary.
The recommended way to implement the tests is to make use of the page pattern, which creates a “shadowed” object of the mobile front-end page. The test can take advantage of Appium’s ability to identify Android application elements such as the input fields and the button by using the @AndroidFindBy annotation with an XPath expression in the object tree and will provide that object as a MobileElement. In addition, you can now configure the possible actions of the page by using public methods to modify the contents of the MobileElement and emit actions on the button.
package com.alex.flutter_sample.appium.pages;

import io.appium.java_client.AppiumDriver;
import io.appium.java_client.MobileElement;
import io.appium.java_client.pagefactory.AndroidFindBy;

public class LoginPage extends BasePage {
    @AndroidFindBy(xpath = "/hierarchy/android.widget.FrameLayout/android.widget.LinearLayout/android.widget.FrameLayout/android.widget.FrameLayout/android.view.View/android.view.View/android.view.View/android.view.View/android.widget.EditText[1]")
    private MobileElement username;

    @AndroidFindBy(xpath = "/hierarchy/android.widget.FrameLayout/android.widget.LinearLayout/android.widget.FrameLayout/android.widget.FrameLayout/android.view.View/android.view.View/android.view.View/android.view.View/android.widget.EditText[2]")
    private MobileElement password;

    @AndroidFindBy(accessibility = "Login")
    private MobileElement loginButton;

    public LoginPage(AppiumDriver<MobileElement> driver) {
        super(driver);
    }

    @Override
    public boolean isDisplayed() {
        return loginButton.isDisplayed();
    }

    public void setUsername(String username) {
        this.username.click();
        wait(2000);
        this.username.clear();
        this.username.sendKeys(username);
    }

    public void setPassword(String password) {
        this.password.click();
        wait(2000);
        this.password.clear();
        this.password.sendKeys(password);
    }

    public void clickLogin() {
        this.loginButton.click();
    }
}
An example Appium test could check if a user can go from the LoginPage to the SecondPage when authenticating with the correct credentials. To set up this scenario, we would create an instance of the LoginPage and check that the page loads successfully. We would then simulate user input (username and password) and trigger a click on the login button. This will cause the page to change and we can ensure that the SecondPage is displayed. Finally, we can take a screenshot of the test run, which will be bundled with the test result of this test run and can be used for manual checks at a later time.
@Test
public void login_withCorrectCredentials_gotoSecondPage() throws InterruptedException {
    // given
    LoginPage loginPage = new LoginPage(driver);

    assertThat(loginPage.isDisplayed(), is(true));

    // when
    loginPage.setUsername("Alex");
    loginPage.setPassword("alex");
    loginPage.clickLogin();

    // then
    assertThat(new SecondPage(driver).isDisplayed(), is(true));
    takeScreenshot("secondPage.png");
}
Run automated Appium tests on AWS Device Farm
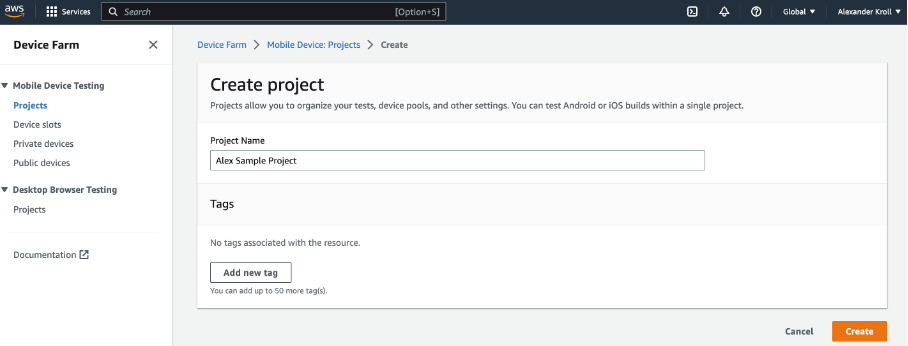
The following steps are required to set up a project in AWS Device Farm to run Appium tests. You need to create an AWS Device Farm project which is just an “organizational unit” that contains a configuration of your application. So, you can simply start by creating a mobile application project.
You can then see the project in the overview of your mobile projects.
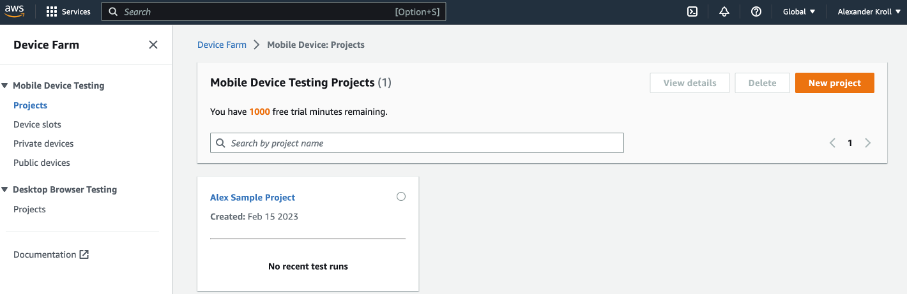
Within the project, you can configure the automated tests and start a new run. In this setup, we want AWS Device Farm to spin up an Android application and automatically run the Appium tests when the device is ready. The other option here would be to provision a device for “remote access”. That would give you a “bare” device to use for various manual testing purposes.
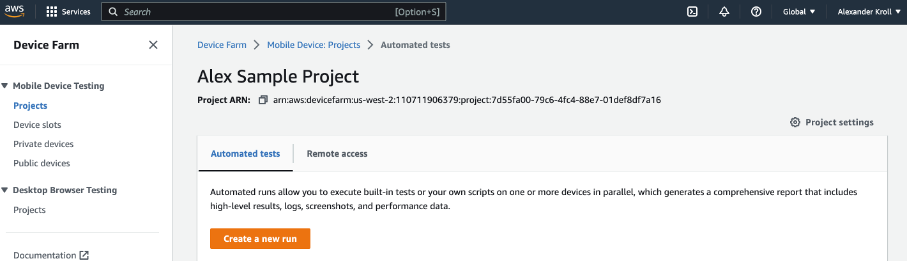
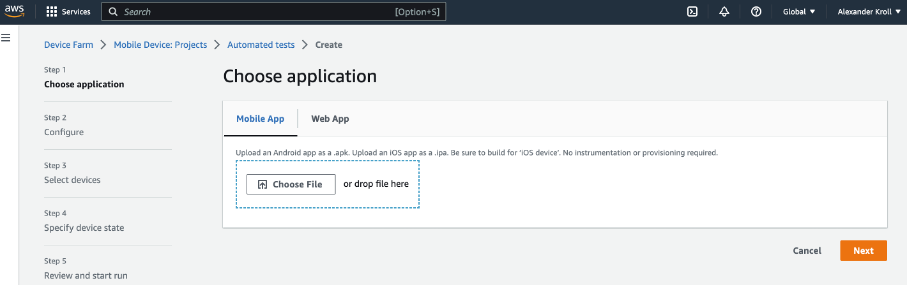
In the project, you have two options for what type of project you want to test on the device. It can be either a mobile application or a web application. In this guide, we will focus on an Android mobile application implemented using the Flutter framework. You will need to upload an apk file (Android Package) and upload it to AWS Device Farm. You can find your app-release.apk file in project-name/module-name/build/outputs/apk/ folder.
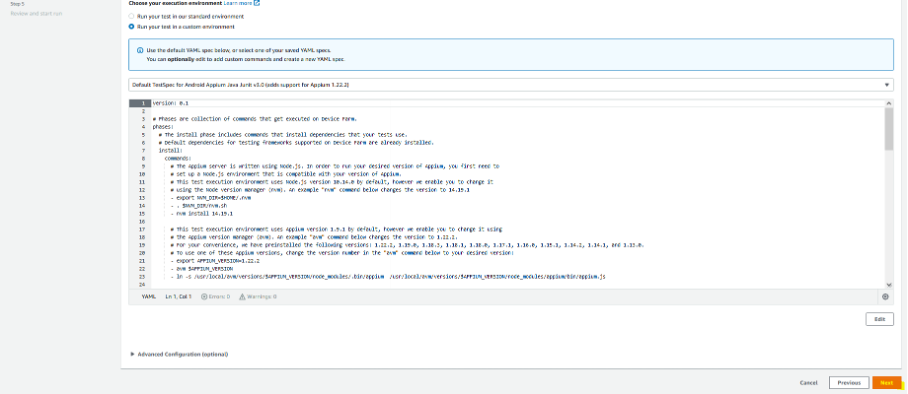
In the configuration section, you have the option to choose between a standard environment setup and a custom environment setup. A custom setup can be very useful if you need to perform some special steps before testing. A typical use case for a custom environment could be the setting of a specific Appium version.
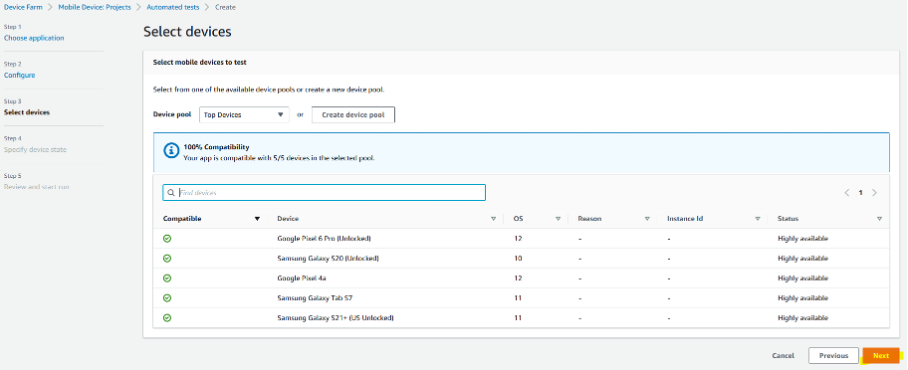
The next step is to select some devices that can be used to run the mobile application. You can choose from more than 100 devices, and you can group devices into a device pool that can be reused. I selected a list of different devices from different vendors such as Samsung and Google. In general, the availability of Samsung devices is very good, while other vendors like Huawei are not available. I also recommend testing the application also on different versions of the Android operating systems in combination with different devices.
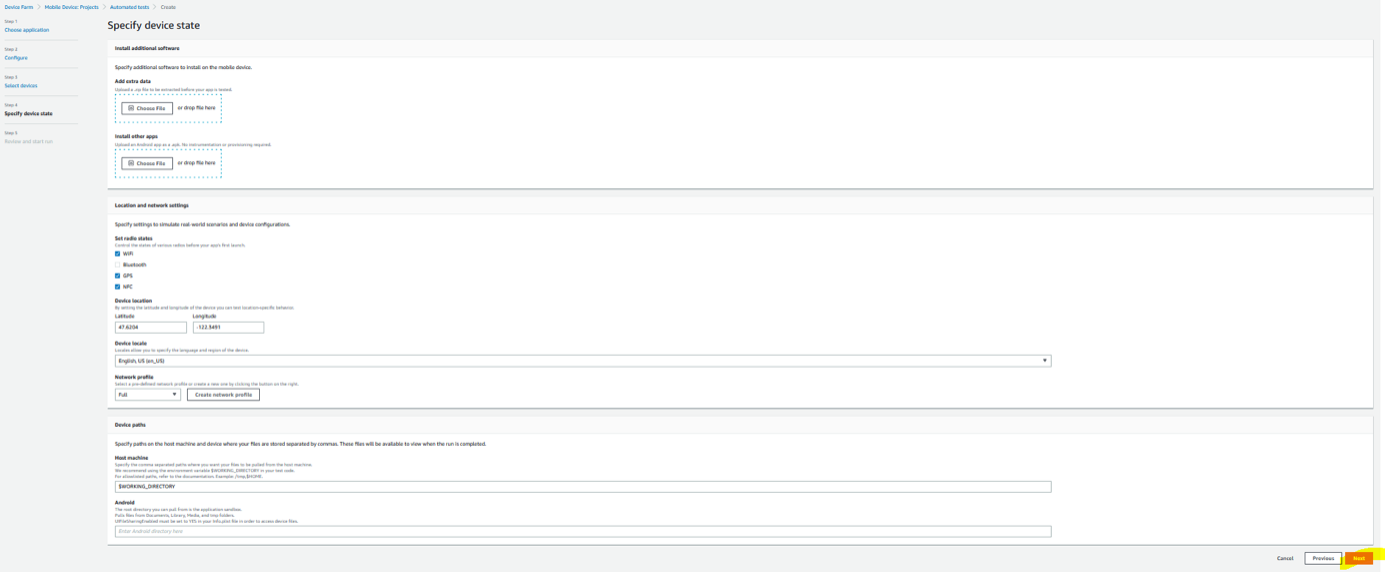
If you want to load specific data onto the device, there is an upload option. You can also specify the device’s network settings geolocation for the test run. This can be useful if you have scenarios where a geolocation is relevant, such as a location-based service using a map, or if you want to test your application with a bad Internet connection, meaning high latency or low bandwidth. In this case, you could also create a network profile. If you are running a multi-market or multi-language application, it might also be useful to have some variations on the locale settings. So, AWS Device Farm gives you a wide range of parameters to achieve the desired state of the device.
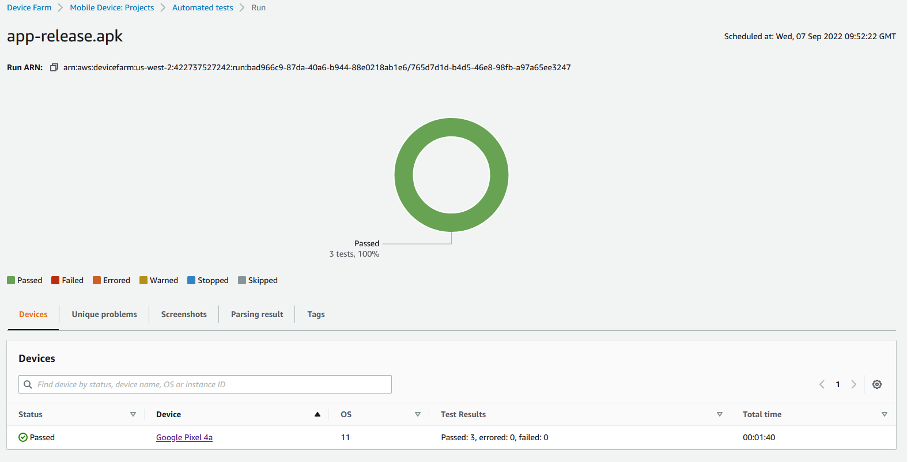
After setting the device state, you can start the automated test runs for which the live status is provided in an overview. A few minutes later, you will see the result of the test in the form of a pie chart showing the success rate of the tests performed.
Check the results of the automated Appium tests
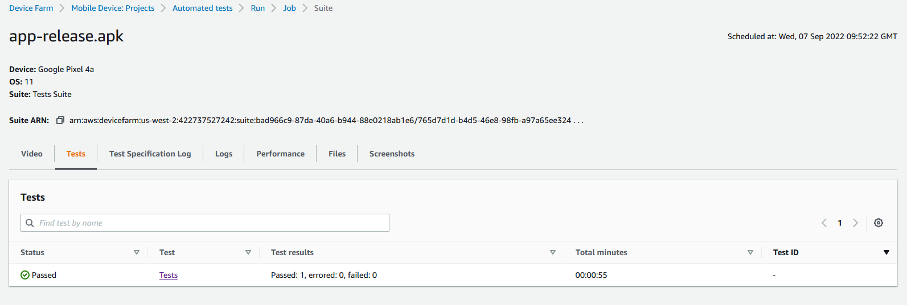
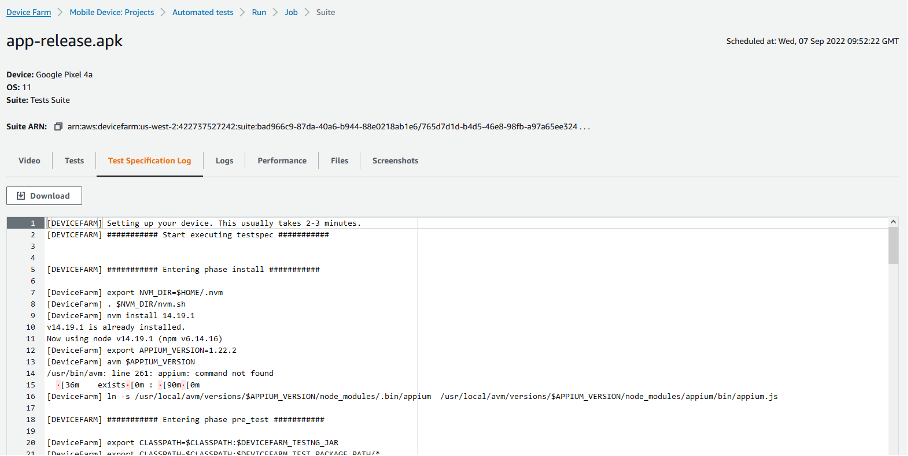
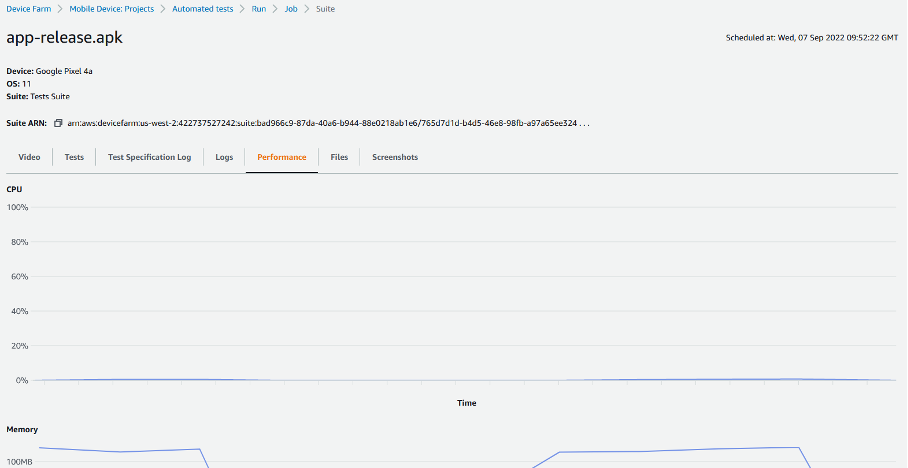
When the test is complete, you can see the jobs, that were run and can drill down into the details of the test run. Typically, it takes about 2-3 minutes to start running tests because of the time it takes to select and prepare a device for you in the AWS Device Farm. After this preparation time, your automated tests will be executed on the specified device, and after execution, the device will be shut down. The result of the automated test run includes various artifacts such as screenshots of the test workflow on the device, a short video of the workflow, the test specification log, the log output, and a very basic performance dashboard of the automated test run that gives a good indication of the CPU and memory usage during the test on the device.
Setup AWS Device Farm project from CLI
If you do not want to perform all the steps manually, it may be more efficient to use the AWS CLI, which allows you to perform all the necessary steps from a shell script. Especially if you want to use a CI/CD tool like Jenkins, Gitlab, and others, these scripted steps can be useful for reuse within some pipeline jobs or steps.
#! /bin/bash
echo "Starting automatic deployment of Alex Sample App with Tests"
# 1. Retrieve PROJECT_ARN
PROJECT_NAME = "Alex Sample Project"
PROFILE = "alex.dev"
REGION = "us-west-2"
PROJECT_ARN = aws devicefarm create-project --name $PROJECT_NAME --profile=PROFILE --region=$REGION | jq '.project.arn'
# 2. Get Upload ARN and URL for Android App
APP_FILE = "app-release.apk"
APP_TYPE = "ANDROID_APP"
APP_UPLOAD_JSON = aws devicefarm create-upload –project-arn $PROJECT_ARN –name $APP_FILE –type $APP_TYPE --profile=$PROFILE --region=$REGION | jq '.upload'
APP_UPLOAD_ARN = jq '.arn' $APP_UPLOAD_JSON
APP_UPLOAD_URL = jq '.url' $APP_UPLOAD_JSON
# 3. Upload the app
curl -T app-release.apk $APP_UPLOAD_URL
# 4. Get Upload ARN and URL for Test App
TEST_FILE = "tests.zip"
TEST_TYPE = "TEST_TYPE"
TEST_UPLOAD_JSON = aws devicefarm create-upload –project-arn $PROJECT_ARN –name $TEST_FILE –type $TEST_TYPE --profile=$PROFILE --region=$REGION | jq '.upload'
TEST_UPLOAD_ARN = jq '.arn' $TEST_UPLOAD_JSON
TEST_UPLOAD_URL = jq '.url' $TEST_UPLOAD_JSON
# 5. Upload the tests
curl -T tests.zip $TEST_UPLOAD_URL
# 6. Create device pool
DEVICE_POOL_NAME = "SampleDevicePool"
DEVICE_POOL_ARN = aws devicefarm create-device-pool –project-arn $PROJECT_ARN –name $DEVICE_POOL_NAME –rules '[{"attribute": "PLATFORM", "operator": "EQUALS", "value": ""ANDROID""}]'  --profile=$PROFILE --region=$REGION | jq '.devicePool'
# 7. Schedule test run
SCHEDULE_RUN_NAME = "Sample-Test-Run"
TEST_RUN_RESULT = aws devicefarm schedule-run –project-arn $PROJECT_ARN –app-arn $APP_UPLOAD_ARN –device-pool-arn $DEVICE_POOL_ARN –name $SCHEDULE_RUN_NAME –test '{"type": "TEST_TYPE","testPackageArn":"' + $TEST_UPLOAD_ARN + '"}'  --profile=$PROFILE --region=$REGION
echo $TEST_RUN_RESULT
Summary
This article has come to an end, and you now have a blueprint and hopefully a good feeling about how to automatically test a Flutter application on AWS Device Farm. My experience with the AWS Device Farm and Android mobile applications has been quite good. The AWS Device Farm UI is simple, but includes the most important features for changing the state of the devices and supports the relevant testing frameworks. Most of the current devices on the market are available within 2 to 6 weeks of their launch. My observation is that the support for some device manufacturers is good (Samsung, Apple, Google), while some other manufacturers like Huawei are not widely supported. However, if you need some very specific devices, you can always make use of the “private devices” features, which is a BYOD (bring your own device) model.
Credits
Title image by metamorworks on Shutterstock