
When it comes to operating applications in the cloud, infrastructure as code tools such as Terraform or Pulumi have established themselves as the de facto standard for infrastructure management in recent years. And these tools work excellently to quickly spin up complex infrastructure and resources in the cloud, but using these tools have a major drawback, in my opinion. They are purely push based and resources or corresponding changes are applied manually or are invoked by any kind of CICD pipeline. They do not take into account the actual state of resources, changes are planned and evaluated against an artificially created state file to keep track of the desired state of resources instead of relying on the actual resources running in the live environment. Or to put it more briefly, resources are provisioned but not managed. So how do we ensure that resources remain the same in the cloud as they were originally provisioned?
In this blog series we will take a look at the Cloud Native Computing Foundation (CNCF) project Crossplane that is able to solve this issue by leveraging Kubernetes as the most common control plane as of today and its extensible API design to elevate our infrastructure management to a whole new level. The Kubernetes API itself is extensible by design and can be extended arbitrarily with Custom Resource Definitions (CRDs) and custom controllers. Crossplane, as claimed by the developers, is an open-source Kubernetes add-on that makes use of this extensibility and lets you transforms your cluster into a universal control plane.
More precisely, this means we can use Crossplane to easily extend our Kubernetes cluster to support orchestrating any kind of external resource or managed service. That way we can use Kubernetes to not only manage services and applications, but also all kinds of cloud infrastructure we might need to run them. Without further ado, let us see how exactly Crossplane works by spinning up our first resource in the cloud. In our case, our cloud provider of choice today will be AWS. Before we can start, we need a Kubernetes cluster that we want to use as our control plane and in which we can install Crossplane. When we have a suitable Kubernetes cluster available, we can create a new namespace named “crossplane-system” and use Helm to install Crossplane with the provided Helm chart as shown below:
1$ kubectl create namespace crossplane-system
2$ helm repo add crossplane-stable https://charts.crossplane.io/stable
3$ helm repo update
4
5$ helm install crossplane --namespace crossplane-system crossplane-stable/crossplane
To check the status of the installation, we can use the Helm command line tool to check the status of our Helm release for Crossplane, and we can also check if all resources are properly running in our newly created namespace with the following commands:
 1# list Helm release for Crossplane
 2$ helm list -n crossplane-system
 3NAME        NAMESPACE           REVISION    UPDATED     STATUS    CHART
 4Crossplane  crossplane-system   1           2023-07-01  deployed  crossplane-1.12.2
 5
 6# get all running Crossplane resources
 7$ kubectl get all -n crossplane-system
 8NAME                                               READY   STATUS    RESTARTS   AGE
 9pod/crossplane-cb755467b-lv6vm                     1/1     Running   0          25s
10pod/crossplane-rbac-manager-69ff585d75-74wdz       1/1     Running   0          25s
11
12NAME                                            READY   UP-TO-DATE  AVAILABLE   AGE
13deployment.apps/crossplane                      1/1     1           1           40s
14deployment.apps/crossplane-rbac-manager         1/1     1           1           40s
15
16NAME                                                DESIRED   CURRENT   READY   AGE
17replicaset.apps/crossplane-cb755467b                1         1         1       40s
18replicaset.apps/crossplane-rbac-manager-69ff585d75  1         1         1       40s
The output should show us a new Helm release named “crossplane”, which should be in the state “deployed” and a deployment/replicaset showing two running pods in our namespace one for the general Crossplane controller and one for the RBAC manager.
The core of Crossplane are Managed Resources (MRs), which are the fundamental building blocks of Crossplane, with a MR being a granular Crossplane representation of a resource in an external system like in our example AWS. Therefore, ideally every AWS resource we want to manage should have an associated MR available in Crossplane. Whereas a MR directly translates to a Kubernetes CRD, resulting in a vast number of CRDs that our Kubernetes cluster potentially has to handle. In order to reduce overhead and keep the number of CRDs manageable, Crossplane does not ship pre-installed with all kinds of different MRs that are available but follows an extensible approach with packages. In Crossplane, there are two different types of packages available to extend Crossplane’s scope of things it can manage, the type of packages that are currently relevant for us are Providers.
Providers bundle a set of MRs and a respective controller to allow Crossplane to provision and manage new kinds of infrastructure resources, or to put it more clearly, a provider extends Crossplane by installing Kubernetes CRDs and controllers for new kinds of MRs. Providers can either be installed via the Crossplane CLI which is available as a kubectl plugin, or we create a new Provider Kubernetes resource via a corresponding YAML manifest, introduced by one of Crossplane’s internal CRDs.
 1# possibility 1:
 2$ kubectl crossplane install provider xpkg.upbound.io/upbound/provider-aws:v0.37.0
 3# possibility 2:
 4$ cat <<EOT >> provider.yaml
 5---
 6apiVersion: pkg.crossplane.io/v1
 7kind: Provider
 8metadata:
 9  name: provider-aws
10spec:
11  package: 'xpkg.upbound.io/upbound/provider-aws:v0.37.0'
12EOT
13
14$ kubectl apply -f provider.yaml
If the installation was successful, we should then see a new provider resource created which should output the status installed and healthy and within our “crossplane-system” namespace. We will also see new pods running for our additional controller and have a range of new CRDs available for each MR our provider has to offer with the following commands:
 1# list installed Crossplane providers
 2$ kubectl get providers
 3NAME          INSTALLED   HEALTHY   PACKAGE                                     AGE
 4provider-aws  True        True      xpkg.upbound.io/cross…/provider-aws:v0.33.0 40s
 5
 6# get all running Crossplane resources
 7$ kubectl get all -n crossplane-system
 8
 9NAME                                              READY   STATUS    RESTARTS   AGE
10pod/crossplane-cb755467b-lv6vm                    1/1     Running   0          14m
11pod/crossplane-rbac-manager-69ff585d75-74wdz      1/1     Running   0          14m
12pod/provider-aws-55f4b7e3267e-6cdb597b94-gjtsb    1/1     Running   0          40s
13
14NAME                                          READY   UP-TO-DATE   AVAILABLE   AGE
15deployment.apps/crossplane                    1/1     1            1           14m
16deployment.apps/crossplane-rbac-manager       1/1     1            1           14m
17deployment.apps/provider-aws-55f4b7e3267e     1/1     1            1           40s
18
19NAME                                               DESIRED   CURRENT   READY   AGE
20replicaset.apps/crossplane-cb755467b               1         1         1       14m
21replicaset.apps/crossplane-rbac-manager-69ff585    1         1         1       14m
22replicaset.apps/provider-aws-55f4b7e3267e-6cdb597  1         1         1       40s
23
24# get all Crossplane CRDs for AWS EC2 resources
25$ kubectl get crds | grep ec2.aws
26addresses.ec2.aws.crossplane.io                   2023-07-01T15:18:10Z
27amicopies.ec2.aws.upbound.io                      2023-07-01T10:31:30Z
28amilaunchpermissions.ec2.aws.upbound.io           2023-07-01T10:31:30Z
29amis.ec2.aws.upbound.io                           2023-07-01T10:31:29Z
30availabilityzonegroups.ec2.aws.upbound.io         2023-07-01T10:31:29Z
31capacityreservations.ec2.aws.upbound.io           2023-07-01T10:31:29Z
32customergateways.ec2.aws.upbound.io               2023-07-01T10:31:30Z
33defaultnetworkacls.ec2.aws.upbound.io             2023-07-01T10:31:29Z
34defaultroutetables.ec2.aws.upbound.io             2023-07-01T10:31:30Z
35defaultsecuritygroups.ec2.aws.upbound.io          2023-07-01T10:31:30Z
36defaultsubnets.ec2.aws.upbound.io                 2023-07-01T10:31:30Z
37defaultvpcs.ec2.aws.upbound.io                    2023-07-01T10:31:30Z
38ebsdefaultkmskeys.ec2.aws.upbound.io              2023-07-01T10:31:30Z
39ebsencryptionbydefaults.ec2.aws.upbound.io        2023-07-01T10:31:30Z
40ebssnapshotcopies.ec2.aws.upbound.io              2023-07-01T10:31:30Z
41ebssnapshotimports.ec2.aws.upbound.io             2023-07-01T10:31:30Z
42ebssnapshots.ec2.aws.upbound.io                   2023-07-01T10:31:30Z
43ebsvolumes.ec2.aws.upbound.io                     2023-07-01T10:31:30Z
44...
Since a Crossplane provider extends Kubernetes with CRDs representing resources in an external system, we also need some sort of authentication to talk to the API of the corresponding external system in which we want to provision resources - in our case AWS. For the authentication of the controller of our AWS provider we need a ProviderConfig in addition to the provider itself. In terms of AWS we can create a Kubernetes secret containing an AWS Access Key and Secret Access key which we can reference in our ProviderConfig as shown below:
 1# create file containing AWS access credentials
 2$ cat <<EOT >> creds.conf
 3[default]
 4aws_access_key_id = <aws_access_key>
 5aws_secret_access_key = <aws_secret_access_key>
 6EOT
 7
 8# create Kubernetes secret
 9$ kubectl create secret generic aws-secret -n crossplane-system \
10--from-file=creds=./creds.conf
11
12# create Crossplane ProviderConfig
13$ cat <<EOF | kubectl apply -f -
14apiVersion: aws.upbound.io/v1beta1
15kind: ProviderConfig
16metadata:
17  name: default
18spec:
19  credentials:
20    source: Secret
21    secretRef:
22      namespace: crossplane-system
23      name: aws-secret
24      key: creds
25EOF
As soon as our AWS provider is installed and healthy and we have created a valid ProviderConfig, we can start provisioning resources in AWS. For our example, we will provision a new VPC named “sample-vpc”. In order to do so we will create a corresponding Kubernetes manifest for our Crossplane MR which represents a new VPC in AWS in the region eu-central-1 with a CIDR block of 172.16.0.0/16 and apply it to our Kubernetes cluster like the example below.
TIP: In each MR definition we have the option to reference a specific ProviderConfig, so for example we can also create several different ProviderConfigs pointing to different AWS accounts, but if no ProviderConfig is referenced, a ProviderConfig named default is searched for and automatically assigned, which we created for our example above. A detailed API reference for each provider, including all available MRs and their attributes, can be viewed via the Upbound Marketplace or via doc.crds.dev. In our case, for our AWS provider, via the following link: API Reference Provider AWS.
 1# create Crossplane MR manifest
 2$ cat <<EOT >> vpc.yaml
 3---
 4apiVersion: ec2.aws.upbound.io/v1beta1
 5kind: VPC
 6metadata:
 7  name: sample-vpc
 8spec:
 9  forProvider:
10    cidrBlock: 172.16.0.0/16
11    region: eu-central-1
12    tags:
13      Name: sample-vpc
14EOT
15
16# create Crossplane MR
17$ kubectl apply -f vpc.yaml
18vpc.ec2.aws.upbound.io/sample-vpc created
After we have handed over our manifest to our Kubernetes control plane, we can query our new Kubernetes VPC resource on our cluster and see our new MR, which shows the status READY and SYNCED as “True”. The status SYNCED is an indicator if our manifest is valid and shows that our MR has been successfully transferred to the Crossplane controller and the status READY shows that our resource has been successfully rolled out in AWS:
1# get status of Crossplane VPC MR
2$ kubectl get vpc.ec2.aws.upbound.io
3NAME READY SYNCED EXTERNAL-NAME AGE
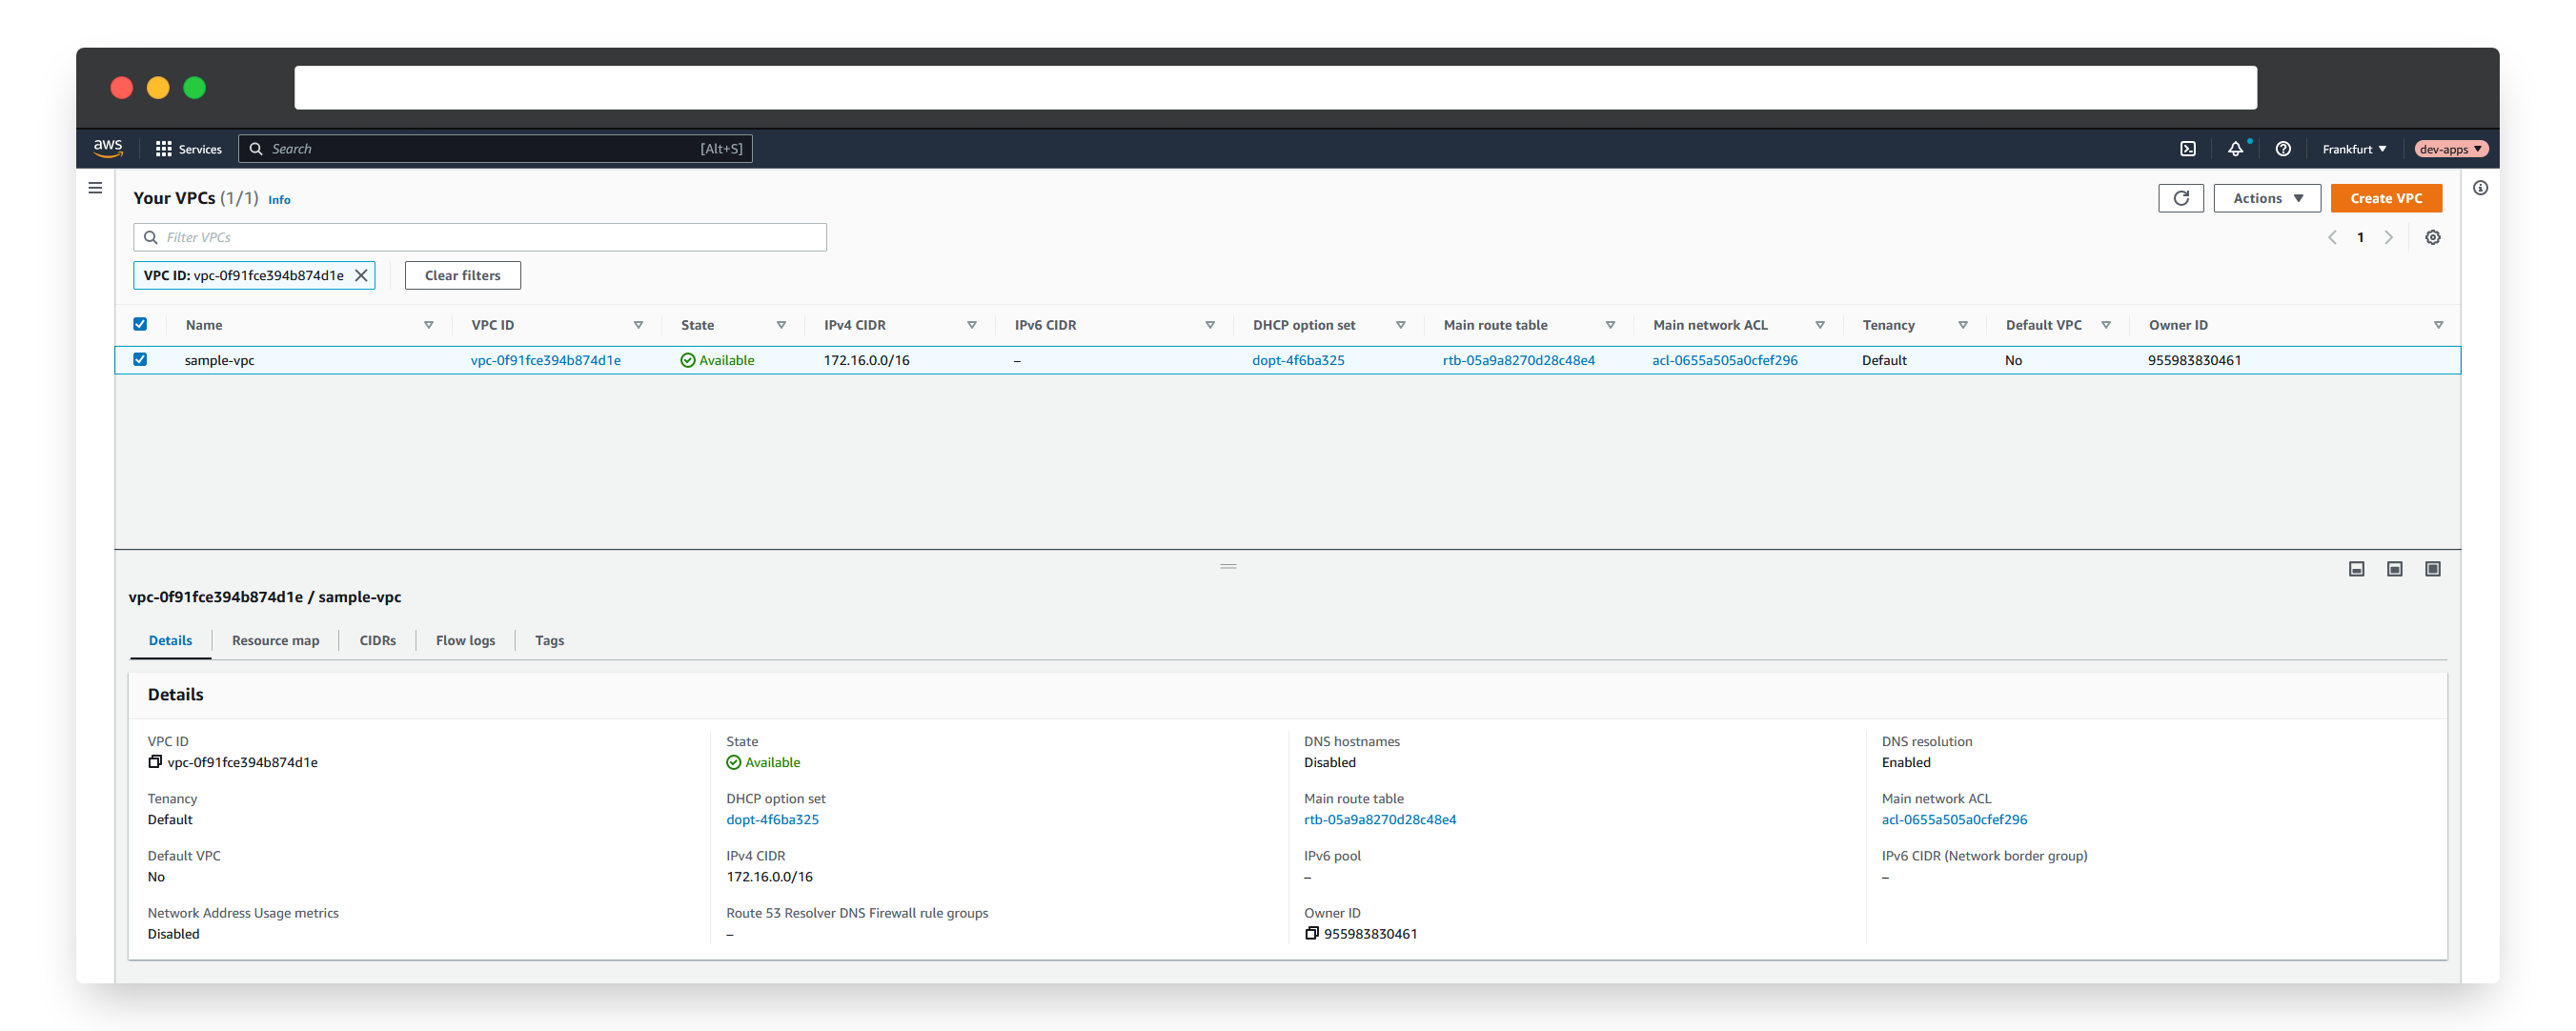
4sample-vpc True True vpc-0f91fce394b874d1e 15sOur MR also outputs an attribute EXTERNAL-NAME. Under the hood, that is an annotation which has special meaning to Crossplane MRs and specifies the identifier of the resource in the external system. In our case it refers to the ID of our AWS VPC which Crossplane uses to identify and keep track of the resource. Since our resource was successfully synced and provisioned, our new VPC with the corresponding ID should now also be visible in the AWS management console:
With that, we have successfully provisioned our first cloud resource using Crossplane, managed via Kubernetes as the control plane.
In theory that’s all we need to manage our cloud infrastructure on a control plane operated level. With the available MRs we can provision and manage every kind of resource we want. However, in my opinion, when it comes to more complex infrastructure setups, such as a fully production ready Kubernetes setup in AWS including a lot of resources, rolling out individual MRs is not really practical. Therefore, Crossplane also offers a feature called Composite Resources (XRs), which can be used to compose multiple MRs and expose it as a new custom Kubernetes resource we can use to provision and manage our infrastructure. How we can create XRs and what we need for this will be covered in the second part of this blog series.
Credits
Title image by ESB Professional on Shutterstock