
Introduction
Running microservices in Kubernetes (also known as k8s) on managed clusters, such as the AWS Elastic Kubernetes Service (EKS) is the current state of the art way for running enterprise software.
With EKS, you can use IAM to control which resources can be used by your EKS workloads. However, sometimes, classic resources such as relational databases, either on-prem or provided by AWS RDS, which use classic authentication mechanisms, need to be integrated with Kubernetes workloads.
For this use case, Kubernetes provides a very simple mechanism called a “secret”. A secret is a Kubernetes resource that can be accessed from a config map or environment definition and which can be passed into a pod to provide information such as usernames, passwords, API-keys and other credentials to the applications within the pod.
This default approach with Kubernetes “secrets” is not very secure, because a Kubernetes secret is just a Base64-encoded string.
This becomes especially problematic if all resources for deploying the application and the infrastructure are to be kept in a source code mangement system (SCM for short) like git, which is required for the GitOps model, for example.
A typical YAML (yet another markup language) definition for such a secret is
apiVersion: v1
kind: Secret
metadata:
    name: secret-demo
    namespace: nttdata-dach-techblog-secrets-demo
data:
    secretvalue: NjNoMzFt
When this yaml file is checked into a git repository, anyone with access to the repository can easily decode the secret value:
$ echo -n "NjNoMzFt" | base64 -d
63h31m
In this article, we will discuss two methods for keeping secrets for a Kubernetes deployment despite checking all resources in an SCM:
The examples in this article have been tested with git-bash, Java JDK 17, Quarkus 3.4.2 and Rancher Desktop 1.10.0 on Windows 10 and 11 machines.
In case you prefer a video over an article, check out the live demo at the end of the article.
Demo application
The demo application is a very simple REST service implemented as a Quarkus app which just returns the value of the Quarkus configuration option “secretvalue” in a JSON structure.
The GET method of the SecretsResource (full source code will be available on github.com/NTTDATA-DACH/TECHblog_code) is quite simple:
@Path("/secrets")
public class SecretsResource {

    @Inject
    Config config;

    @GET
    @Produces(MediaType.APPLICATION_JSON)
    public Secrets secrets() {
        Secrets secrets = new Secrets(config.getValue("secretvalue", String.class));
        return secrets;
    }
}
When started as a quarkus application like this
java -Dsecretvalue=63h31m -jar target/secrets-demo-1.0.0-runner.jar
one can get the response from the simple REST service using curl:
$ curl http://localhost:8080/secrets
{"secretValue":"63h31m"}
Standard Deployment: Insecure Secrets
First of all, we will create a standard deployment with a “normal” secret definition in a .yaml file, as a baseline.
In order to deploy the simple demo app in a Kubernetes cluster (e.g. k3s which is part of Rancher Desktop), we need a Dockerfile to create a container image from the application:
FROM amazoncorretto:17.0.8-al2023-headless
ENV LANGUAGE='en_US:en'
ENV SECRETVALUE='default_from_image'
COPY target/secrets-demo-1.0.0-runner.jar secrets-demo-1.0.0-runner.jar
EXPOSE 8080
CMD ["java","-jar", "secrets-demo-1.0.0-runner.jar"]
To create a container image from the Dockerfile use:
docker build -f src/main/docker/Dockerfile.jvm -t nttdata-dach-techblog/secrets-demo .
With the following Kubernetes yaml files in the folder src/main/k8s/standard
- 00_namespace.yaml
apiVersion: v1
kind: Namespace
metadata:
  name: nttdata-dach-techblog-secrets-demo
- 01_secret.yaml
apiVersion: v1
kind: Secret
metadata:
  name: secrets-demo
  namespace: nttdata-dach-techblog-secrets-demo
data:
  secretvalue: NjNoMzFt
- 02_deployment.yaml
 1apiVersion: apps/v1
 2kind: Deployment
 3metadata:
 4  name: secrets-demo-deployment
 5  namespace: nttdata-dach-techblog-secrets-demo
 6  labels:
 7    app: quarkus-app
 8spec:
 9  replicas: 1
10  selector:
11    matchLabels:
12      app: quarkus-app
13  template:
14    metadata:
15      labels:
16        app: quarkus-app
17    spec:
18      containers:
19        - name: quarkus-app
20          image: nttdata-dach-techblog/secrets-demo:latest
21          imagePullPolicy: Never
22          env:
23            - name: SECRETVALUE
24              valueFrom:
25                secretKeyRef:
26                  name: secrets-demo
27                  key: secretvalue
we can deploy our container to our Kubernetes cluster using kubectl:
kubectl apply -f src/main/k8s/standard/
In the “env” section (lines 23 ff) the Kubernetes secret “secrets-demo” is mapped to an environment variable “SECRETVALUE”. With the Quarkus configuration mechanism, the environment variable “SECRETVALUE” is made available as a configuration option “secretvalue”.
Using
kubectl -n nttdata-dach-techblog-secrets-demo get all
we can check, if all resources have been created successfully.
When everything is up and running, we can start a port-forwarding, to enable the access to the pod in our deployment using curl:
kubectl -n nttdata-dach-techblog-secrets-demo port-forward pod/<pod-name> 8080:8080
<pod-name> needs to be replaced with the name of the actual pod!
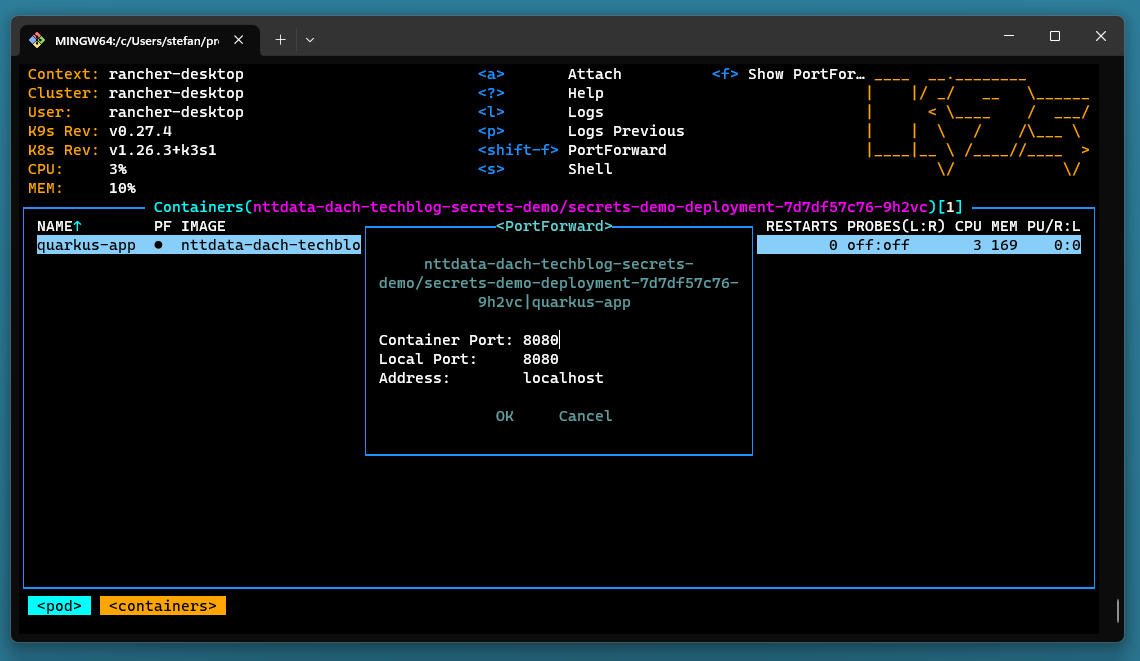
If you are using k9s, you can also create a temporary port forwarding in k9s, by navigating to the pod and pressing Shift-F:
In the git repository you’ll also find a bash script “start_port_forwarding.sh” which determines the podname and then starts the forwarding.
By the way: Instead of checking all the resources we create in this article using kubectl on the commandline you can also use k9s to browse them.
With
curl http://localhost:8080/secrets
we should now get the same result:
{"secretValue":"63h31m"}
Because the string “NjNoMzFt” is just the Base64 encoded value of “63h31m”, as we can easily check with this commands:
echo -n "NjNoMzFt" | base64 -d
Sealed Secrets
The idea with sealed secrets is, that an kubernetes operator is deployed to the cluster which uses private/public key encryption.
Part of the solution is a command line tool kubeseal which makes a call to the sealed secrets operator within your cluster and returns an encrypted version of your secret, for which the yaml definition can be checked in to the SCM, without exposing the actual secret.
The operator will decrypt the secret and expose it to your deployments in the same way as with the standard configuration.
Installation of the sealed secrets operator
To install the sealed secrets operator via helm, we first have to add the repository where the Helm-Chart for the operator is stored to the list of known chart repositories:
helm repo add sealed-secrets https://bitnami-labs.github.io/sealed-secrets
To check, which repositories are already registered with the k8s cluster, use
helm repo list
After the repository has been added, the operator can be installed:
helm install sealed-secrets sealed-secrets/sealed-secrets
Encryption
After the operator for sealed secrets has been installed successfully, the kubeseal command line utility can be used to encrypt our secret value.
The command
kubectl -n nttda-dach-techblog-secrets-demo create secret generic secret-name --dry-run=client --from-literal=secretva
lue=63h31m -o yaml
creates the .yaml for a normal insecure secret, as we have seen it already in the introductory example:
apiVersion: v1
data:
  secretvalue: NjNoMzFt
kind: Secret
metadata:
  creationTimestamp: null
  name: secret-name
  namespace: nttda-dach-techblog-secrets-demo
The kubeseal command line utility takes this definition as an input and writes an encrypted version to the output. The encryption uses the k8s cluster which is defined in the current context. Therefore, the created .yaml file can be used for a specific cluster only.
kubectl -n nttdata-dach-techblog-secrets-demo create secret generic secret-demo --dry-run=client --from-literal=secretva
lue=63h31m -o yaml \
  kubeseal --namespace nttdata-dach-techblog-secrets-demo --controller-name=sealed-secrets --controller-namespace=kube-system --format=yaml > 04_sealed_secret.yaml
The content of the file “04_sealed_secret.yaml” is:
apiVersion: bitnami.com/v1alpha1
kind: SealedSecret
metadata:
  creationTimestamp: null
  name: secrets-demo
  namespace: nttdata-dach-techblog-secrets-demo
spec:
  encryptedData:
    secretvalue: AgAupxhzCsAUKyLKs+iLvrH30HhHMaNL7xVyyhwo7xi8PufB62ndGZnak2FPSt+i5zqN7uscA2G7UbNAwsGguoivISS0Pj01nJJnxRZBe40IzqLthNR9HK8Osau+E2Y/GL/EmO4PA61h2Anf3PCOAV4n6ZNPXxwfOBTY/QVlHMi9X7xDsatJClqY6nxfBsdPZghYIymXOC2IkJyXZD5rFaxKDeV00O8n/Bl+IYU42UTh64gAvyhR2ChsVWWy/XrO3+C5bYozSyFuocP8Id5rwTqeIrqAGMAxJGHjUY/175+2TH3XKwcraiRJcmahABcgOd6S3d/4kZF4dLCaYhNJuq88enZBcLffvzuVSbmWH2zaHtt2YL02Fr874oA0fnI3kUmTxlLLdQBHiGCy3bpCAsGJFMOZG1qpfCFfb+DZmsn6YxD4hjZqAQY4QTSPuezZRRQuv3IWL+FQ/vQAk7V56NlGwCwwPPwGF4iAW3GHGO0bZ+S12alpqk1Q1UbIMldLoDki5dMi+bNvt51nQ/Z9oi6bdLUD2ODhs3n+w7e/rLvd0TT0fau5b35RYh52Co+/dvIb1vQS9ny/2rE147ly8YRDXsGW3PYwoLsJYch91mAJypz29W41ISx0E9bg2ZR7WYrtwdTjkgs9c5PTzENTAikb8eCwW+MjEUwL6jpw3mR2m+HTK0nLGciIclvgU9yPISWtl7bEb3Y=
  template:
    metadata:
      creationTimestamp: null
      name: secrets-demo
      namespace: nttdata-dach-techblog-secrets-demo
The new .yaml file for the sealed secret can now be applied:
kubectl -n nttdata-dach-techblog-secrets-demo apply -f 04_sealed_secret.yaml
To check, that the SealedSecrets custom resource has been created, we run
$ kubectl -n nttdata-dach-techblog-secrets-demo get sealedsecrets
NAME           STATUS   SYNCED   AGE
secrets-demo            True     5m38s
The sealed secrets operator will decrypt the SealedSecret resource and creates a “normal” secret, which can be checked using kubectl:
kubectl -n nttdata-dach-techblog-secrets-demo get secrets
The result is:
NAME           TYPE     DATA   AGE
secrets-demo   Opaque   1      7m55s
When we get the secret definition using
kubectl -n nttdata-dach-techblog-secrets-demo get secret/secrets-demo -o json
we will get
{
    "apiVersion": "v1",
    "data": {
        "secretvalue": "NjNoMzFt"
    },
    "kind": "Secret",
    "metadata": {
        "creationTimestamp": "2023-10-13T16:32:00Z",
        "name": "secrets-demo",
        "namespace": "nttdata-dach-techblog-secrets-demo",
        "ownerReferences": [
            {
                "apiVersion": "bitnami.com/v1alpha1",
                "controller": true,
                "kind": "SealedSecret",
                "name": "secrets-demo",
                "uid": "e9fcdfd1-1403-4a9a-825a-9aee04b2adef"
            }
        ],
        "resourceVersion": "414404",
        "uid": "4144785b-00aa-41dd-b277-4231719f04fa"
    },
    "type": "Opaque"
}
In the output of the last kubectl, we see again the now familiar Base64 encoded string of “63h31m” which is “NjNoMzFt”
Since the sealed secret is “translated” to a conventional k8s secret by the operator, the application must not be changed at all.
In most setups one will have to deal with multiple cluster like dev, test, int and prod. With sealed secrets, the encryption needs to be done for each cluster separately.
Here is a convenience script for bash to create a sealed secret with interactive input (it assumes the kubeseal CLI command to be installed in the “gopath”):
#!/usr/bin/env bash

if [ $# -lt 1 ] ; then
    echo -n "Enter Secret Value: "
    read -s VALUE
else
    VALUE=$1
fi

SECRET_NAME=secrets-demo
TARGET_NAMESPACE=nttdata-dach-techblog-secrets-demo
CONTROLLER_NAMESPACE=default

OS=$(uname -a)

if [[ "${OS}" =~ ^MINGW.* ]] ; then
    KUBESEAL='/c/Program Files/Go/go/bin/kubeseal.exe'
else
    KUBESEAL=${GOPATH}/bin/kubeseal
fi

kubectl create secret generic ${SECRET_NAME} --dry-run=client --from-literal=secretvalue="${VALUE}" -o yaml | \
    "${KUBESEAL}" --namespace=${TARGET_NAMESPACE} --controller-name=sealed-secrets --controller-namespace=${CONTROLLER_NAMESPACE} --format=yaml \
    > src/main/k8s/sealed_secrets/04_sealed_secret.yaml
Deployment definition
The deployment file for our java app will be the same as before, because we still refer to the “normal” secret “secrets-demo”.
The only difference is, that the “secrets-demo” secret is automatically provided by the sealed secrets operator with the definition in the SealedSecret resource definition file. A .yaml file with an Base64 encoded password for the “secret-demo” secret is not required anymore.
You can check this by deleting the secret
kubectl -n nttdata-dach-techblog-secrets-demo delete secret/secrets-demo
If you then run
kubectl -n nttdata-dach-techblog-secrets-demo get secrets
you will see the secret again, because it has immediately been re-created by the sealed secrets operator after deletion.
As the encrypted secret is part of the deployment definition files (in this case 04_sealed_secret.yaml), any change of the secret value requires a change of the deployment YAML files in the SCM.
Clean up “sealed secrets”
Before we can start with the demo of the external secrets operator, we should clean up:
helm delete sealed-secrets
We will also delete the secret, which has been created by the sealed secrets operator:
kubectl -n nttdata-dach-techblog-secrets-demo delete secret/secret-demo
External Secrets Operator
In a corporate environment you will probably already have established tools for handling secrets, such as
and many more.
The idea with External Secrets is, to use one of those existing and proven solutions in conjunction with your Kubernetes workloads.
To use this external tools with the “external secrets” operator, many “providers” exist, for example:
Installation of the external secrets operator
The external secrets operator is installed using helm.
First, the chart repository for the external secrets operator must be added to the list of the helm repositories:
helm repo add --force-update external-secrets https://charts.external-secrets.io
Then installed the operator in a separate namespace “external-secrets”
helm install external-secrets external-secrets/external-secrets -n external-secrets --create-namespace
Demo setup with the “fake” provider
With the external secrets operator, we need “store” resources for each “store”, we want to integrate our cluster. You can define different stores for the same type of provider, e.g. if you want to define different secrets in different AWS regions. For local testing purposes, we will use the “fake” provider, which allows to define fixed values in its resource definition (see src/main/k8s/external_secrets/03_external_secret_store.yaml in the git repository):
apiVersion: external-secrets.io/v1beta1
kind: ClusterSecretStore
metadata:
  name: demo-store
  namespace: nttdata-dach-techblog-secrets-demo
spec:
  provider:
    fake:
      data:
      - key: "secretvalue"
        value: "63h31m"
        version: "v1"
In this case, the provider is the “fake” provider and the store is defined in the namespace “nttdata-dach-techblog-secrets-demo” as “demo-store”.
In the target namespace, a resource of type “ExternalSecret” is defined to map values from the store to the conventional secrets (see src/main/k8s/external_secrets/04_external_secret_resource.yaml in the git repository):
apiVersion: external-secrets.io/v1beta1
kind: ExternalSecret
metadata:
  name: secrets-demo-external-secret
  namespace: nttdata-dach-techblog-secrets-demo
spec:
  refreshInterval: 5m
  secretStoreRef:
    name: demo-store
    kind: ClusterSecretStore
  target:
    name: secrets-demo
  data:
  - secretKey: "secretvalue"
    remoteRef:
      key: 'secretvalue'
      version: v1
In this example, the refresh interval is 5 minutes, so you should see the updated secret in the target namespace after 5 minutes.
After deploying everything, we can start a port forwarding as in the previous examples and should get the same results.
Clean up “external secrets”
helm -n external-secrets delete external-secrets
Summary
“secrets” in Kubernetes are not very secure:
- Values are just Base64 encoded strings
- Secrets can be revealed when the corresponding .yaml file is checked in to an SCM
Sealed Secrets and the External Secrets Operator both provide a way to more securely handle secrets outside of the cluster (e.g., in configuration files which are checked into a source code management system). The Kubernetes “secrets” resource is created by the operator at runtime.
However, within the cluster, the secrets are still made available as the default Kubernetes secret, so that anyone with sufficient access rights can see the values of the secret.
The advantage of this approach is that applications created for default Kubernetes secrets do not need to be modified when one of the operators is introduced.
| Sealed Secrets | External Secrets Operator | |
|---|---|---|
| PROS |
|
|
| CONS |
|
|
As promised, here is a demo and comparison of the three configurations:
Recommendation
For a simple use case, sealed secrets are a good solution that does not require additional infrastructure, but they have some drawbacks. For an enterprise environment (or when running on a large public cloud like AWS, Azure or GCP) the external secrets operator is the much more versatile solution and should be used.
Credits
Title image by Blackboard on Shutterstock